Firebase Analytics plugin in the react-native:
In this tutorial, I am going to discuss “How To Implement Firebase Analytics in React Native App”.
Firstly we need to understand analytics and the importance of analytics in any react-native app, this is a very important part of any react native app read it carefully.
Firebase analytics and firebase events are connected with each other if you want to understand any of them then you need to understand both of them, so let’s start the tutorial.
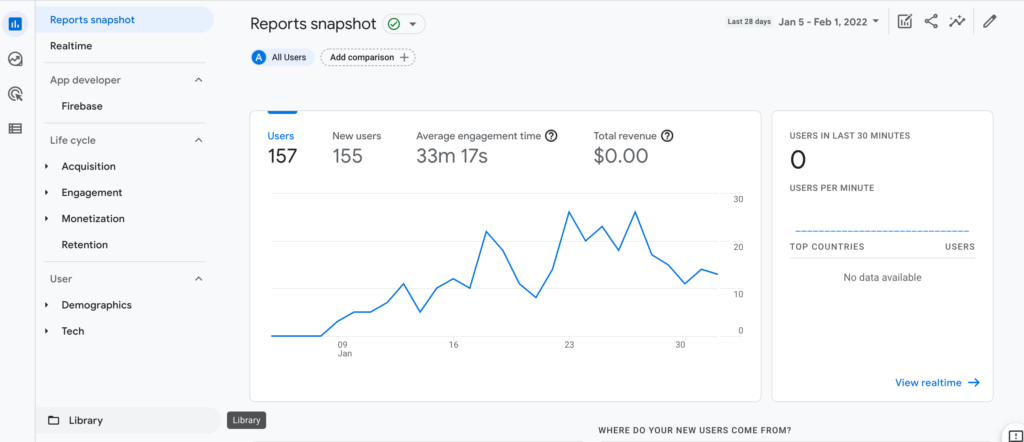
App Analytics looks like –
Meaning of analytics –
So here we are going to understand analytics, before explaining about analytics first I want to share a situation. What is the issue – If you create a very good app but you are not able to find how many users are daily visiting your app.
And the solution is very easy it’s firebase analytics.
So if you want to trigger every event in your app then you need to use firebase analytics and put the events in the screens which you want to trigger.
however by using analytics you can understand the past user visits in your app and how much time he spends on which screen. by using analytics you find the insights and user engagement in-app.
Importance of analytics –
We all know that internet marketing is very important in this era. so using analytics you can identify your requirements and make them more useful for your business.
Thirdly very important thing for using analytics, you must have created the project in firebase. if you don’t have please check this link and set up the project. https://www.itechinsiders.com/how-to-send-firebase-notification-in-react-native/
Step 1 – Project creation
Firstly we need to create a react native project for implementing the analytics.
react-native init analyticsProjecrStep 2 – Run the app
Now we run the app so we check everything is working fine.
react-native run-androidStep 3 – Install the plugin
Secondly We are going to install the firebase plugin for analytics.
npm install @react-native-firebase/app
npm install @react-native-firebase/analytics
or---
# Install & setup the app module
yarn add @react-native-firebase/app

# Install the analytics module
yarn add @react-native-firebase/analytics

# If you're developing your app using iOS, run this command
cd ios/ && pod install
Here we have 2 – plugins, one important for setup the firebase and the other for analytics.
Step 4 – Implementing the analytics plugin
however we are going to implement the analytics in our app and we use it on different screens as well different ways.
import analytics from '@react-native-firebase/analytics';How analytics work –
- Events – By using events, we collect analytics for user actions, system events, and errors.
- User properties – Here you define the user segment base such as user preferences, etc.
Events Type –
- Predefined Events
- Custom Events
- Reserved Events
Analytics Layers:
Automatic events –
You don’t need to implement these types of events, when you install the analytics in your project then it is automatically implemented.
the detailed list is here: https://support.google.com/firebase/answer/6317485
Custom events –
For logging a custom event we use the logEvent method. we check this.
- log event
await analytics().logEvent("event_name", {"key_1": "value_1", "key_2": "value_2"});

await analytics().logEvent('cat_view', {
id: '123456',
name: 'cloth',
});
}
2. Attaching user data in analytics
You can attach the user analytics information by using setUserId, setUserProperties and setUserProperty.
Most importantly each firebase project can have up to 25 uniquely named and case-sensitive user properties.
await Promise.all([
   analytics().setUserId(userid),
   analytics().setUserProperty('account', userAccount),
]);
}
3. Screen Tracking
Now We use the setCurrentScreen method for tracking the journey of users in-app.
 // Set & override the MainActivity screen name
    await analytics().setCurrentScreen(screen, screen);
4. Log for app opening
await firebase.analytics().logAppOpen();4. Log for sign-in/sign up
await firebase.analytics().logLogin({
method: 'facebook',
});

await firebase.analytics().logSignUp({
method: 'facebook',
});
5. Log for user property
await analytics().setUserId("id");
await analytics().setUserProperty('email', email);
await analytics().setUserProperties('accountType', {
	'subscription': 'pemi'
});
6. Reset analytics data
however for resetting the analytics data firebase provides a method.
await analytics().resetAnalyticsData();You can create a separate file for analytics and put all the method here and call it when required.
Complete code –
import analytics, { firebase } from '@react-native-firebase/analytics';

    class Analytics {
      static init() {
        if (firebase.app().utils().isRunningInTestLab) {
          analytics().setAnalyticsCollectionEnabled(false);
        } else {
          analytics().setAnalyticsCollectionEnabled(true);
        }
      }

      static onSignIn = async userObject => {
        const { id, email } = userObject;
        await Promise.all([
          analytics().setUserId(id),
          analytics().setUserProperty('email', email), // <--- TRY TO NOT GIVE ANY PERSONAL INFO !!!
          this.logEvent("sign_in")
        ]);
      };

      static onSignUp = async userObject => {
        const { id, email } = userObject;
        await Promise.all([
          analytics().setUserId(id),
          analytics().setUserProperty('email', email),  // <--- TRY TO NOT GIVE ANY PERSONAL INFO !!!
          analytics().setUserProperty('created_at', new Date()),
          this.logEvent("sign_up")
        ]);
      };

      static setCurrentScreen = async screenName => {
        await analytics().setCurrentScreen(screenName, screenName);
      };

      static logEvent = async (eventName, propertyObject = {}) => {
        await analytics().logEvent(eventName, propertyObject);
      }

      static onSignOut = async () => {
        await analytics().resetAnalyticsData();
      };
    }

    export default Analytics;
So we completed the react-native analytics which is “How To Implement Firebase Analytics in React Native App“
Here You find my next post here.
Here is my B2B startup app link – https://play.google.com/store/apps/details?id=com.beparr.buyer
My website for B2B – https://www.beparr.com/
In conclusion If have any queries or issues, please feel free to ask.
Happy Coding Guys.

Hi, I am a professional Ionic and React Native Pixel Perfect App Designer and Developer, with expertise in Client Communication, Bug Fixing, Third Party Lib, Version Control Tools, Requirement Understanding, and managing teams, I have 6+ years of experience in the same domain as well as in Codeigniter, JS, IoT, and more than 10 other languages. For the last 6+ years, not a single day went without design/development.
Please follow me on Medium: https://nehadwivedi1004.medium.com/