
What is a React Native Bridge –
In this article, I am going to discuss bridging in react native, which is “How To Create Bridge Between Android And React Native”.
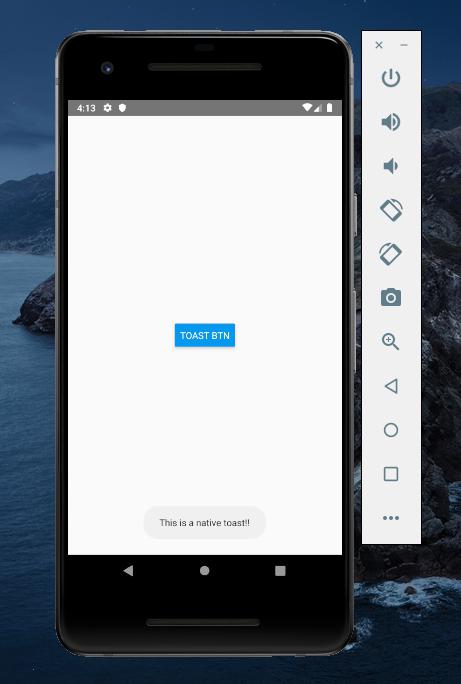
Example Output –
We all know that the meaning of bridge, the bridge is created for connecting 2 – different things. so here we use the bridge with react native and android.
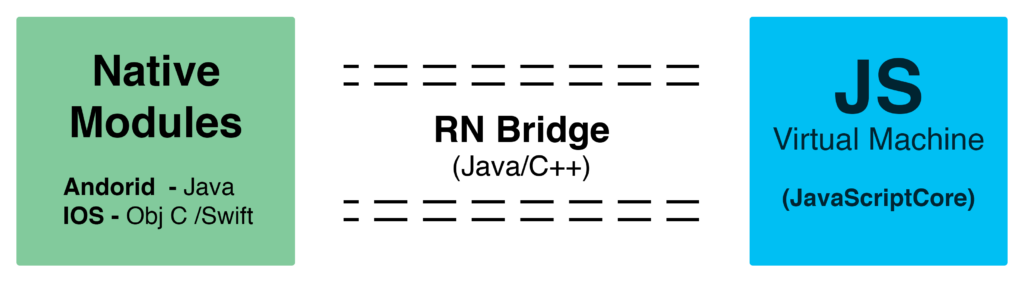
React Native provide a module for creating bridge between native and react native code, so here we going to discuss about that.
Why do we use bridge –
When you want to reuse your existing Java code(android) or library without reimplement it in JavaScript or react native, so we simply use the concept of bridging for this.
What we will learn –
We are going to discuss about following 2 – parts in this article.
- Native Modules
- Native UI Components
Note – One more this in this article i am talk about android only.
About Native Modules –
So Native Module is a set of javascript functions which is implemented natively for each platform and we use the Native Modules when we doesn’t have React Native required module, or when the native performance is more better.
Example of native and react native bridge –
For the concept understanding, we will implement a toast mechanism where the toast is coming from the native android and we will call it by using a button that is created in react native.
Let’s Start Implementing –
You have the android studio installed in your system.
Step 1 –
First you need to create a blank react native project.
react-native init bridgeImplementationProjectNow got to the path of project.
cd bridgeImplementationProjectStep 2 –
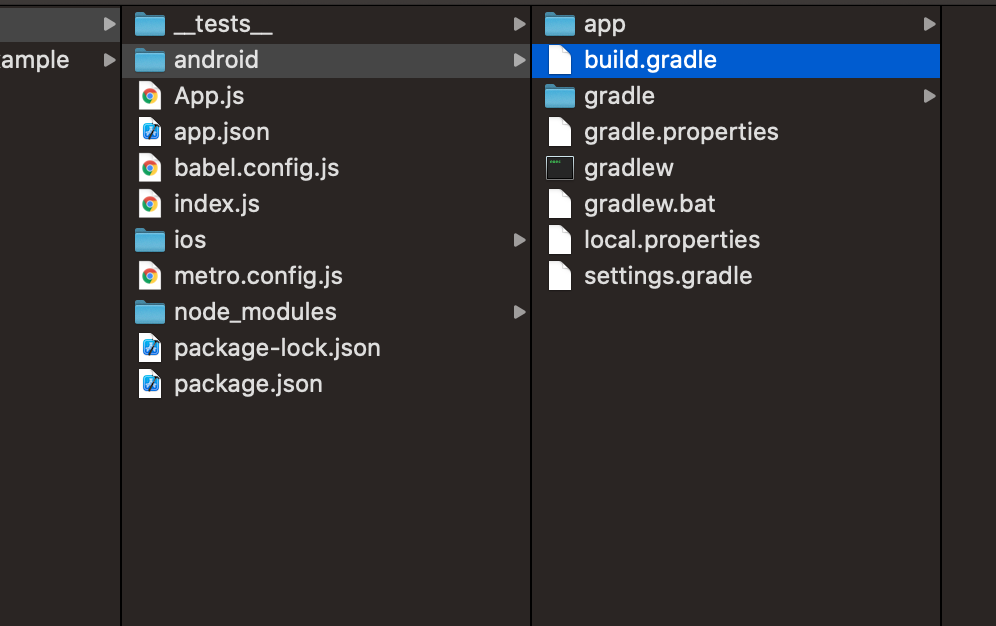
You find a folder with the ‘android’ name in your project. Open it with Android Studio.
Step 3 –
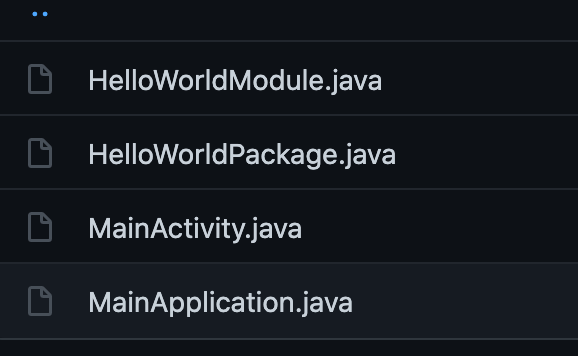
Take the native files from your developer and put them in the path – /android/app/src/main/java/com/,
These 2 – files are very important for creating a bridge which is HelloWorldModule.java and HelloWorldPackage.java, looks like
Step 4 –
Here we provide the definition of HelloWorldModule.java and HelloWorldPackage.java files.
HelloWorldModule.java
HelloWorldModule.java

package com.nativebridge;
import android.widget.Toast;
import android.util.Log;

// https://facebook.github.io/react-native/
//these lines are imported for creating bridge
import com.facebook.react.bridge.NativeModule;
import com.facebook.react.bridge.ReactApplicationContext;
import com.facebook.react.bridge.ReactContext;
import com.facebook.react.bridge.ReactContextBaseJavaModule;
import com.facebook.react.bridge.ReactMethod;
//end
public class HelloWorldModule extends ReactContextBaseJavaModule {
    private static ReactApplicationContext reactContext;

    HelloWorldModule(ReactApplicationContext context){
        super(context);
        reactContext = context;
    }

    @Override
    public String getName(){
        return "HelloWorldModule";
    }

    @ReactMethod
    public void ShowMessage(String message, int duration){
        Log.d("HELLO_WORLD_MODULE", message);
        Toast.makeText(getReactApplicationContext(), message, duration).show();
    }
}
HelloWorldPackage.java
HelloWorldPackage.java

package com.nativebridge;
// start these lines are imported for creating bridge
import com.facebook.react.ReactPackage;
import com.facebook.react.bridge.NativeModule;
import com.facebook.react.bridge.ReactApplicationContext;
import com.facebook.react.uimanager.ViewManager;
//end
import java.util.ArrayList;
import java.util.Collections;
import java.util.List;

import com.nativebridge.HelloWorldModule;

public class HelloWorldPackage implements ReactPackage{

    @Override
    public List<ViewManager> createViewManagers(ReactApplicationContext reactContext){
        return Collections.emptyList();
    }

    @Override
    public List<NativeModule> createNativeModules(ReactApplicationContext reactContext){
        List<NativeModule> modules = new ArrayList<>();
        modules.add(new HelloWorldModule(reactContext));
        return modules;
    }
}
Step 5 –
To access the showToast function we made in the HelloWorldModule.java.
Now we create a button in react-native by clicking on that we will call the showToast function.
For implementing this we need to import the { NativeModule } from react-native in the app.js file.
import { View, Text, NativeModules, TouchableOpacity } from "react-native";
Step 6 –
Now you need to call the native function by using nativeModule, here you call your module file, in above we create 2 – files one is module and other is package so from where you call the module file.
const HelloWorld = NativeModules.HelloWorldModule;Step 7 –
Here we implement the complete code of app.js file.
import React, { Component } from "react";
import { Platform, View, Text, NativeModules, TouchableOpacity } from "react-native";

const HelloWorld = NativeModules.HelloWorldModule;

export default class App extends Component{
  render(){
    return(
      <View style={{flex:1, alignItems: "center", justifyContent:'center'}}>
        <TouchableOpacity onPress={()=>{
          if(Platform.OS == "android"){
            NativeModules.HelloWorldModule.ShowMessage("This is first time we are creating bridge. :)", 5000);
          }
        }}>
          <Text>Click Me!</Text>
        </TouchableOpacity>
      </View>
    )
  }
So we completed the react-native refresh control which is “How To Create Bridge Between Android And React Native“
For code please check the – https://github.com/trimitrtech/ReactNativeBridgeExample
Likewise You can find my next post here.
If have any query or issues, please feel free to ask.
Happy Coding Guys.

Hi, I am a professional Ionic and React Native Pixel Perfect App Designer and Developer, with expertise in Client Communication, Bug Fixing, Third Party Lib, Version Control Tools, Requirement Understanding, and managing teams, I have 6+ years of experience in the same domain as well as in Codeigniter, JS, IoT, and more than 10 other languages. For the last 6+ years, not a single day went without design/development.
Please follow me on Medium: https://nehadwivedi1004.medium.com/