Introduction of React Navigation –
In this tutorial, we are going to discuss a step-by-step example of React Navigation in React Native, which is titled “Navigation in React Native With Example | by Neha Dwivedi”.
We use React-Navigation for switching between the screens, we all know that mobile apps contain multiple screens, so when we want to go from one screen to another screen we use the router, which we implement using React Navigation.
When we developed any mobile apps using react native then our basic concern is how we handle the navigation, there is other navigation available as well but some of them are slow and some of them are not suitable so the best library for handling navigation in React Native is React Navigation.

What is React Navigation?
React Navigation is a separate library, by using this you are able to implement the navigation or routing functionality in a React Native application.
React Navigation library is written in JavaScript and it does not use the native navigation APIs directly for Android and iOS. it generates some sets of those APIs. By using this you are able to integrate third-party JS plugins with customization and easier debugging, for this, you do not need to learn Swift, Objective-C, Kotlin, Java, etc.
Break down the integration steps –
Here we break down the blogs in steps, so it is easy to you to follow the blog.
- Create a fresh React Native App
- Run the app
- Install and setup the Navigation
- Types of Navigation
- Implement the navigation
So let’s start following the steps.
Step 1 – Create A React Native App
Firstly we need to create a React Native app for implementing React Navigation.
react-native init reactNavigationExpProjectStep 2 – Run the app
Now we run the app so we check everything is working fine.
react-native run-androidStep 3 – Install and setup the React Navigation npm module
Here we have to install the required navigation npm lib. Run the following commands to install the React Navigation.
Using npm -
npm install @react-navigation/native

Using Yarn -
yarn add @react-navigation/native
Installing dependencies for React Native project
npm install react-native-screens react-native-safe-area-contextNote – 1) From React Native 0.60 and higher, linking is automatic. So you don’t need to run react-native link.
2) If you’re on a Mac and developing for iOS, you need to install the pods (via Cocoapods) to complete the linking.
Run the below cmd for pod installation under the ios folder.
npx pod-install Step 4 – Types of navigation
- For Drawer – If you want to create navigation for the drawer then you need to install the following library.
npm i @react-navigation/drawerOutput Example of Drawer –
2. For Stack – If you want to create navigation for the stack then you need to install the following library.
npm i @react-navigation/stack- Required dependency by the stack navigator
npm install react-native-gesture-handlerAdd the above lib at the top (make sure it’s at the top and there’s nothing else before it) of your entry file, such as index.js or App.js:
import 'react-native-gesture-handler';- Required 2nd dependency by the stack navigator
npm install @react-native-masked-view/masked-viewOutput Example of Stack –
Step 5 – Implement the Navigation
Here we are going to discuss the complete integration flow for navigation so let’s start.
- Firstly we create a separate file for routing definition which is named Route.js
- Secondly, we call this file App.js
So let’s see the code for the App.js
import 'react-native-gesture-handler';
import React, {Component} from 'react';
import {View} from 'react-native';
import Router from './src/container/router/index';

export default class App extends Component {
  render() {
    return (
      <View style={{flex: 1}}>
        <Router />
      </View>
    );
  }
}
Now we are going to define the Router.js file, We define some steps and follow that so you understand properly how we implement the Router.js file.
- First, we need to import all dependency
- Secondly, we import the files which you want to put in the navigation
- Then we define the createStackNavigator for stack navigation
- And createDrawerNavigator for drawer navigation
- So I already created 2 – files with the name of home and setting, you also need to create one or more files for navigation integration.
- And we create a separate side menu file for the drawer
1. So as we discuss the above point, let’s start integrating the first point by importing dependency.
//Core react native package
import React, {Component} from 'react';
import {SafeAreaView, Dimensions} from 'react-native';

//Dependency librarary
import {NavigationContainer} from '@react-navigation/native';
import {createStackNavigator} from '@react-navigation/stack';
import {createDrawerNavigator} from '@react-navigation/drawer';

//These are the screens for navigation
import Login from '../../screens/Login';
import Splash from '../../screens/Splash';
import Home from '../../screens/Home';
import Settings from '../../screens/Settings';

//Side menu file for drawer
import SideMenu from '../Drawer/SideMenu';
2. Now we are creating a separate function for all screens, we are going to use.
function SplashScreen({navigation}) {
  return (
    <>
      <Splash navigation={navigation} />
    </>
  );
}

function LoginScreen({navigation}) {
  return (
    <>
      <Login navigation={navigation} />
    </>
  );
}

function HomeScreen({navigation}) {
  return (
    <>
      <Home navigation={navigation} />
    </>
  );
}

function SettingsScreen({navigation}) {
  return (
    <>
      <SettingsScreen navigation={navigation} />
    </>
  );
}
3. So now we need to define a function where all screens are called as stack and here we use the stack navigator as well.
function AllScreen({navigation, route}) {
  return (
    <>
      <SafeAreaView>

        <Stack.Navigator initialRouteName="Splash">
          <Stack.Screen
            name="Splash"
            component={SplashScreen}
            options={{headerShown: false}}
            initialParams={{screenname: 'Splash'}}
          />
          <Stack.Screen
            name="Login"
            component={LoginScreen}
            options={{headerShown: false}}
          />

          <Stack.Screen
            name="Home"
            component={HomeScreen}
            options={{headerShown: false}}
          />


          <Stack.Screen
            name="Settings"
            component={SettingsScreen}
            options={{headerShown: false}}
          />
        </Stack.Navigator>
      </SafeAreaView>
    </>
  );
}
4. Now we create 2 – separate navigation one for stack and another for drawer.
const RootStack = createStackNavigator();
const Drawer = createDrawerNavigator();
5. Here we create the main Router file code and export it also define the NavigationContainer here.
export default class Router extends Component {
  render() {
    return (
      <>
        <NavigationContainer independent={true}>
          <RootStack.Navigator initialRouteName="Splash">
            <RootStack.Screen
              name="Main"
              component={AllScreen}
              options={{headerShown: false}}
              initialParams={{screenname: 'Splash'}}
            />
            <RootStack.Screen
              name="Splash"
              component={Splash}
              options={{headerShown: false}}
            />
            <RootStack.Screen
              name="Login"
              component={Login}
              options={{headerShown: false}}
            />
            <RootStack.Screen
              name="Home"
              options={{headerShown: false}}
              component={MyDrawer}
            />
          </RootStack.Navigator>
        </NavigationContainer>
      </>
    );
  }
}
6. In the above code you see one component which is MyDrawer, here we are going to define this component and use this for drawer defining.
function MyDrawer() {
  return (
    <Drawer.Navigator
      initialRouteName="Home"
      drawerContent={props => <SideMenu {...props} />}
      drawerType="slide"
      edgeWidth={250}
      hideStatusBar={Platform.OS === 'android' ? true : false}
      drawerPosition="left"
      drawerStyle={{
        width:
          Dimensions.get('window').width - Dimensions.get('window').width / 5,
      }}>
      <Drawer.Screen
        name="Home"
        component={Home}
        options={{headerShown: false}}
      />
      <Drawer.Screen
        name="Settings"
        component={Settings}
        options={{headerShown: false}}
      />
    </Drawer.Navigator>
  );
}
here we use the Sidemenu component as drawerContent so we also need to create this component as well, you can put this file according to your project structure, you only need to import that path here and pass the component.
7. In this step we implement the side menu component.
Here is the complete code for opening the drawer as a side menu, but use it after replacing my image and string, and other imports to your own.
import React, {Component} from 'react';
import {
  View,
  Text,
  Dimensions,
  StyleSheet,
  Image,
  ScrollView,
  Linking,
  TouchableOpacity,
  SafeAreaView,
} from 'react-native';
//these are my custome functions only use this if it is availble in your project, if not then please remove all of this and use your own
import {moderateScale} from '../../utils/ResponsiveUi';
import {images, fonts, colors} from '../../themes';
import strings from '../../themes/strings';
import FunctionUtils from '../../utils/FunctionUtils';

const {width, height} = Dimensions.get('window');

class side_menu extends Component {
  constructor(props) {
    super(props);
    this.state = {};
  }

  menuItemClick(id) {
    let {navigation} = this.props;
    if (id === 1) navigation.navigate('Home');
    else if (id === 2)alert('Work on progress');

    navigation.closeDrawer();
  }

  //Design:- render design here..
  render() {
    return (
      <SafeAreaView style={styles.mainViewDesign}>
        <ScrollView
          style={styles.mainSideView}
          bounces={false}
          showsVerticalScrollIndicator={false}>
          <View style={{flex: 1}}>
            <View style={styles.imgRowView}>
              <TouchableOpacity onPress={() => this.menuItemClick(1)}>
                <View style={styles.logoImgView}>
                  <Image
                    source={images.green_logo}
                    resizeMode="contain"
                    style={styles.userImg}
                  />
                </View>
              </TouchableOpacity>
            </View>
            <Text numberOfLines={1} style={styles.userName}>
              {'APP_NAME'}
            </Text>
            <View>
              <View style={styles.optionsInnerMainView}>
                <TouchableOpacity
                  style={[styles.optionsRowView]}
                  onPress={() => this.menuItemClick(1)}>
                  <Image source={images.about} style={styles.menuImges} />
                  <Text style={styles.sideOptionsTxt}>{strings.about}</Text>
                </TouchableOpacity>
                <View style={styles.horizontalLine} />
                <TouchableOpacity
                  style={[styles.optionsRowView]}
                  onPress={() => this.menuItemClick(2)}>
                  <Image source={images.setting} style={styles.menuImges} />
                  <Text style={styles.sideOptionsTxt}>{strings.setting}</Text>
                </TouchableOpacity>
              </View>
            </View>
          </View>
        </ScrollView>
      </SafeAreaView>
    );
  }
}

export default side_menu;

const styles = StyleSheet.create({
  mainSideView: {
    marginHorizontal: moderateScale(15),
    marginTop: moderateScale(15),
    height: '96%',
    backgroundColor: colors.white,
  },
  mainViewDesign: {
    flex: 1,
    borderTopRightRadius: 30,
    borderBottomRightRadius: 30,

  },
  imgRowView: {
    flexDirection: 'row',
    width: '100%',
  },
  logoImgView: {
    width: '33%',
  },
  userImg: {
    height: moderateScale(80),
    width: moderateScale(80),
    marginBottom: moderateScale(10),
  },
  logoImg: {
    height: moderateScale(40),
    width: moderateScale(80),
    resizeMode: 'contain',
  },
  userName: {
    fontFamily: fonts.PoppinsRegular,
    fontSize: moderateScale(15),
    color: colors.colorBlack,
    fontWeight: '500',
    marginRight: moderateScale(10),
  },
  optionsInnerMainView: {
    marginTop: height / 20,
  },
  optionsRowView: {
    flexDirection: 'row',
    alignItems: 'center',
    paddingVertical: height * 0.025,
  },
  menuImges: {
    height: moderateScale(20),
    width: moderateScale(18),
    resizeMode: 'contain',
  },
  horizontalLine: {
    height: 0.5,
    width: '60%',
    backgroundColor: colors.colorGray,
  },
  sideOptionsTxt: {
    color: colors.blackShade,
    fontSize: moderateScale(15),
    fontFamily: fonts.PoppinsRegular,
    fontWeight: '500',
    marginLeft: moderateScale(10),
  },
});
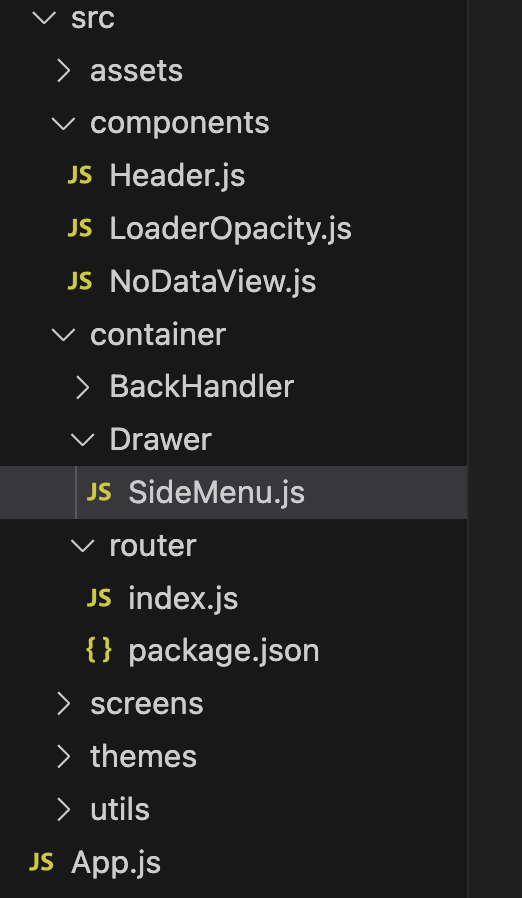
8. My project structure looks like the below image, you use it in your own structure.
So our tutorial is completed and now I am going to post my complete code for the Router.js file.
I hope you didn’t face any issues at the time of integration but if you have any doubts confusion or issues just comment here.
import React, {Component} from 'react';
import {SafeAreaView, Dimensions} from 'react-native';
import Login from '../../screens/Login';
import Splash from '../../screens/Splash';
import Home from '../../screens/Home';
import Settings from '../../screens/Settings';
import SideMenu from '../Drawer/SideMenu';
import {NavigationContainer} from '@react-navigation/native';
import {createStackNavigator} from '@react-navigation/stack';
import {createDrawerNavigator} from '@react-navigation/drawer';

function SplashScreen({navigation}) {
  return (
    <>
      <Splash navigation={navigation} />
    </>
  );
}

function LoginScreen({navigation}) {
  return (
    <>
      <Login navigation={navigation} />
    </>
  );
}

function HomeScreen({navigation}) {
  return (
    <>
      <Home navigation={navigation} />
    </>
  );
}

function SettingsScreen({navigation}) {
  return (
    <>
      <SettingsScreen navigation={navigation} />
    </>
  );
}

const Stack = createStackNavigator();

function AllScreen({navigation, route}) {
  return (
    <>
      <SafeAreaView>
        <Stack.Navigator initialRouteName="Splash">
          <Stack.Screen
            name="Splash"
            component={SplashScreen}
            options={{headerShown: false}}
            initialParams={{screenname: 'Splash'}}
          />
          <Stack.Screen
            name="Login"
            component={LoginScreen}
            options={{headerShown: false}}
          />
          <Stack.Screen
            name="Home"
            component={HomeScreen}
            options={{headerShown: false}}
          />
          <Stack.Screen
            name="Settings"
            component={SettingsScreen}
            options={{headerShown: false}}
          />
        </Stack.Navigator>
      </SafeAreaView>
    </>
  );
}

function MyDrawer() {
  return (
    <Drawer.Navigator
      initialRouteName="Home"
      drawerContent={props => <SideMenu {...props} />}
      drawerType="slide"
      edgeWidth={250}
      hideStatusBar={Platform.OS === 'android' ? true : false}
      drawerPosition="left"
      drawerStyle={{
        width:
          Dimensions.get('window').width - Dimensions.get('window').width / 5,
      }}>
      <Drawer.Screen
        name="Home"
        component={Home}
        options={{headerShown: false}}
      />
      <Drawer.Screen
        name="Settings"
        component={Settings}
        options={{headerShown: false}}
      />
    </Drawer.Navigator>
  );
}

const RootStack = createStackNavigator();
const Drawer = createDrawerNavigator();

export default class Router extends Component {
  render() {
    return (
      <>
        <NavigationContainer independent={true}>
          <RootStack.Navigator initialRouteName="Splash">
            <RootStack.Screen
              name="Main"
              component={AllScreen}
              options={{headerShown: false}}
              initialParams={{screenname: 'Splash'}}
            />
            <RootStack.Screen
              name="Splash"
              component={Splash}
              options={{headerShown: false}}
            />
            <RootStack.Screen
              name="Login"
              component={Login}
              options={{headerShown: false}}
            />
            <RootStack.Screen
              name="Home"
              options={{headerShown: false}}
              component={MyDrawer}
            />
          </RootStack.Navigator>
        </NavigationContainer>
      </>
    );
  }
}
So we completed the react-native React Navigation which is “Navigation in React Native With Example | by Neha Dwivedi“
Here You find my next post here.
Here is my B2B startup app link – https://play.google.com/store/apps/details?id=com.beparr.buyer
My website for B2B – https://www.beparr.com/
In conclusion, If have any queries or issues, please feel free to ask.
Happy Coding Guys.

Hi, I am a professional Ionic and React Native Pixel Perfect App Designer and Developer, with expertise in Client Communication, Bug Fixing, Third Party Lib, Version Control Tools, Requirement Understanding, and managing teams, I have 6+ years of experience in the same domain as well as in Codeigniter, JS, IoT, and more than 10 other languages. For the last 6+ years, not a single day went without design/development.
Please follow me on Medium: https://nehadwivedi1004.medium.com/