Why we need to support multi-language in our app:
Language is a very important part of any app, as we all know nowadays for every business we need an app, and if we want to release our app worldwide or more than one country then it must provide the language support of that country as well.
So let’s start to implement the “How to create a multilanguage support app in react-native”
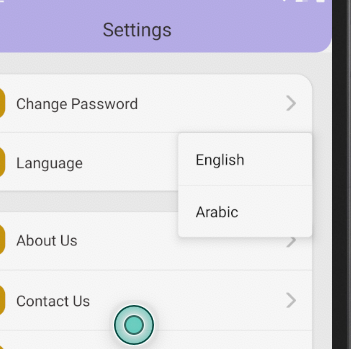
Output Example –

Prerequisites:
You must have basic knowledge of react native and app creation in react native, understand the importance of third party plugin installation and setup.
Getting Started:
We’ll be building a React Native app which will support English, German, and Arabic.
Step 1:
Firstly we need to create a react native app and install the plugin which is a basic requirement of the app.
- Creating a react native app command –
react-native init multi-Language-support- Go to the path of the app – cd multi-Language-support
- Install the library in the app – We are going to use
react-native-localize,this library gives you access to localization-related device constants but does not come with ani18nlibrary –
npm install react-native-localize- We use
I18n.jsto provide I18n translations to the JavaScript –
npm install i18n-js- We know that
i18n-jsdoes not provide any cache/memoization, so we are going to uselodash.memoizefor the memorization –
npm install lodash.memoizeStep 2: Add translations
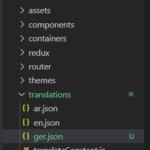
Create a translation directory within your src folder which contains the JSON file of all three languages – Arabic, English, German.
Create a translations directory inside src and then create three JSON files, one for each language.
1. en.json for English
2. ger.json for German
3. ar.json for Arabic
like this-
Now we are going to create JSON object with keys and values for each language.
The key must be same for each language.
The value will be the text that we want to show to the user and will be different for each language.
ar.json(Arabic language) –
{
"AppName": "اسم التطبيق"
}
en.json(Arabic language) –
{
 "AppName" :  "Hello World"
}
ger.json(Arabic language) –
{
 "AppName"  : " Hallo Welt"
}
Similarly, you can add more key-value pairs for every text that will be used in the app.
Now we are going to create a main code file, where we call this.
Step 3: Add Code
It is totally depend to you where you want to add the code, if you want that your app identify the language of user phone at the time of app load then put this code in your app.js file or you can create a new file and import that file every places where you want to change the app language, so let’s start.
open your translateConstant.js file and put the put the code here and import all the third party here.
- import all the liabraries
import * as RNLocalize from "react-native-localize"
import i18n from "i18n-js";
import memoize from "lodash.memoize"; // Use for caching/memoize for better performance
import { I18nManager, SafeAreaView } from "react-native"
2. Now we are going to add the helper function and this is a complete file of code.
import * as RNLocalize from 'react-native-localize';
import i18n from 'i18n-js';
import memoize from 'lodash.memoize';
import { I18nManager } from 'react-native';

export const translationGetters = {
  // lazy requires (metro bundler does not support symlinks)
  ar: () => require('./ar.json'),
  en: () => require('./en.json'),
};

export const translate = memoize(
  (key, config) => i18n.t(key, config),
  (key, config) => (config ? key + JSON.stringify(config) : key),
);

export const getDefaultLanguage = async () => {
  const { languageTag, isRTL } = await RNLocalize.findBestAvailableLanguage(Object.keys(translationGetters))
  return languageTag
}

export const setI18nDefaultConfig = () => {
  //use for finding best language in your system
  const { languageTag, isRTL } = RNLocalize.findBestAvailableLanguage(Object.keys(translationGetters))

  console.log("languageTag", languageTag)
  console.log("isRTL", isRTL)

  // clear translation cache
  translate.cache.clear();
  // update layout direction
  I18nManager.forceRTL(isRTL);
  // set i18n-js config
  i18n.translations = { [languageTag]: translationGetters[languageTag]() };
  i18n.locale = languageTag;
};

export const setI18nConfig = (language, isRtl) => {
  const fallback = { languageTag: language, isRTL: isRtl };
  const { languageTag, isRTL } = fallback;

  console.log("languageTag", languageTag)
  console.log("isRTL", isRTL)

  // clear translation cache
  translate.cache.clear();
  // update layout direction
  I18nManager.forceRTL(isRTL);
  // set i18n-js config
  i18n.translations = { [languageTag]: translationGetters[languageTag]() };
  i18n.locale = languageTag;
};
Step 4: Use it in another file
Now i am going to use this in my register page
import { setI18nConfig, translationGetters, translate } from '../translations/translateConstant'
export default class RegisterSuccess extends Component {
constructor(props) {
super(props);
setI18nConfig(); // set initial config
this.state = {}  }
componentDidMount() {
RNLocalize.addEventListener("change", this.handleLocalizationChange);  }
componentWillUnmount() {
RNLocalize.removeEventListener("change", this.handleLocalizationChange);
}
handleLocalizationChange = () => {
setI18nConfig();
this.forceUpdate();
}

render() {
 return (
  <SafeAreaView style={styles.container}>
  <Text>  {translate("AppName")} /> </Text>
  </SafeAreaView>
)
}
We called setI18nConfig() in the constructor which will set the initial configuration.
In componentDidMount(), we add an event listener which will listen for any changes and call handleLocalizationChange() if any changes occur.
The handleLocalizationChange() method fires setI18nConfig() and forceUpdate(), because in android device components need to re-render.
And remove the listener in componentWillUnmount() method.
Now in the render() we return AppNAmeby using translate() and passing the key as a parameter into it. It will then automatically figure out the language and the text that needs to be shown for that language.
That’s it, now you can run your application it support the 3 different languages.
and you can find my post on medium as well click here please follow me on medium as well.
So this “How to create a multilanguage support app in react-native” is completed, “you can find the next issue list here.
And if any other query/issue, please feel free to ask.
Happy Coding Guyz.


