
What is virtual reality –
VR means virtual reality, in today’s era we all know how virtual reality is growing day by day, so in this article, I am going to discuss “How to build virtual reality app in react native“.
Output Example –

By using Virtual Reality (VR) we get the experience of three-dimensional reality, this technology is boundless. by using VR we found totally immersive and gaming applications.
If you want to create a Virtual Reality (VR) app in react native then it accessible by a third party platform called ViroReact. by using this platform React Native allows developers to build cross-platform AR/VR applications.
ViroReact supports the ARKit, ARCore, VR Cardboard, Gear VR, and Daydream.
What is ViroReact –
ViroReact is a platform that used to build AR (Augmented Reality) and VR (Virtual Reality) applications. It uses the ARKit and ARCore to implement the mobile app. ViroReact is an open source so you do not have to worry about anything.
ARCore is used to AR development platform for Android and ARKit is used to the iOS platform.
ARCore and ARKit supported devices –
ViroReact has two components –
- React components for VR/AR development
- High-performance 3D rendering engine
So let’s start the creation of react native app by using ViroReact.
Setting up the Testbed App –
There is an app called Testbed App which is provided by the Viro to see the virtual reality in your app, so first you need to install this app in your device.
It has a few samples of testbed applications that are build using ViroReact core, install the Viro Media App on iOS devices, go to this link app store here and for Android, go to the Play store here link.
ViroReact Core API –
For accessing the ViroReact core we need to a API key so you go to the viromedia.com create a new account and login you will get an API key on the registered email. put that API key in your app.js file.
App.js Changes –
After get API key, you need to put it into your app.js as follows.
/* Insert your API key below */
var sharedProps = {
  apiKey:"API_KEY_HERE",
}
Now Test The Testbed App –
Now you need to open this app but before open this we need to run the command npm start in your viro terminal.
react-viro-cli use the ngrok packager service that provides an endpoint for run Viro Media app on a real device.
- You’r ViroReact screen in your real device is look like.

- Now you click on the icon on the top left for open the menu bar where you find the name of Testbed app.

- In the menu bar, you find the option. now enter the ngrok endpoint generated in the terminal on running
npm start.

- After that click the button
Goand you will see the two options to choose an environment for VR or AR, Click onVRoption.
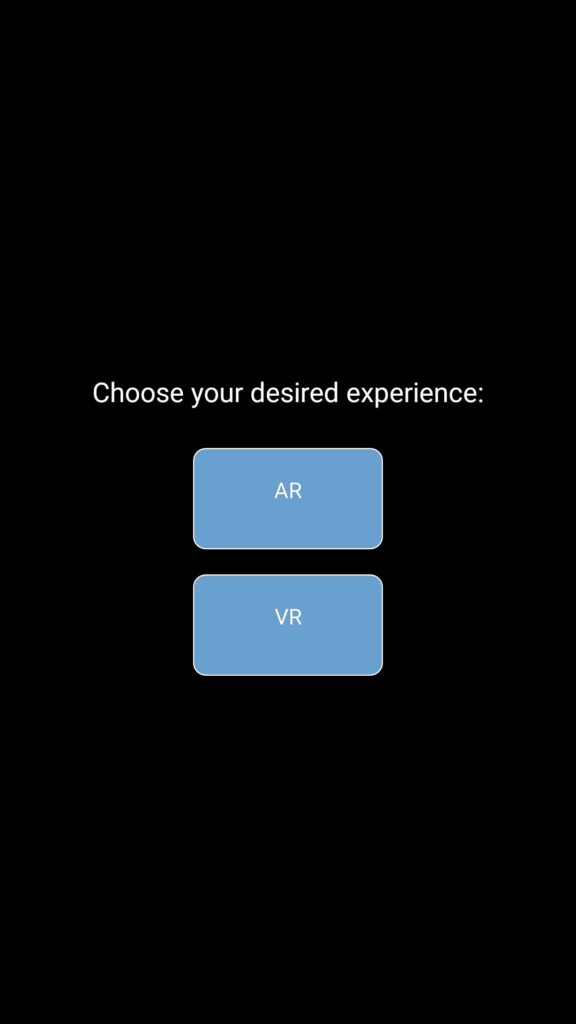
Now you see the pre-installed application your device.
Now we are ready to integrating the Viro app.
Step 1 – Setup the Viro CLI –
You need to install the Viro CLI tool for generating a React Native project which has all the dependencies of the VR/AR app.
npm install -g react-viro-cliStep 2 – Creating a react-native app
First we create a react-native app for implementing VR app.
react-native init VRExampleStep 3 – Installing the VR plugin
Now we need to install the npm plugin for virtual reality.
npm i react-viroStep 4 – Import the plugin
import the plugin where you want to integrate the react-viro app.
import {
  ViroScene,
  ViroText,
  Viro360Image,
} from 'react-viro';
Step 5 – Design the Virtual Reality view
Now we design the virtual reality view within the render method by using this view.
render() {
    return (
      <ViroScene>
        <Viro360Image source={require('./res/guadalupe_360.jpg')} />
        <ViroText text="Hello World!" width={2} height={2} position={[0, 0, -2]} style={styles.helloWorldTextStyle} />
      </ViroScene>
    );
  }
Step 6 – Whole code
Your code will be like this.
import React, { Component } from 'react';
import {StyleSheet} from 'react-native';
import {
  ViroScene,
  ViroText,
  Viro360Image,
} from 'react-viro';

export default class HelloWorldScene extends Component {
  constructor() {
    super();
    this.state = {} // Set initial state here
  }

  render() {
    return (
      <ViroScene>
        <Viro360Image source={require('./res/guadalupe_360.jpg')} />
        <ViroText text="Hello World!" width={2} height={2} position={[0, 0, -2]} style={styles.helloWorldTextStyle} />
      </ViroScene>
    );
  }

}

var styles = StyleSheet.create({
  helloWorldTextStyle: {
    fontFamily: 'Arial',
    fontSize: 60,
    color: '#ffffff',
    textAlignVertical: 'center',
    textAlign: 'center',
  },
});
Setup the App in iOS –
To set up the plugin in iOS what you all need to run the following pod command to set up the third party in iOS.
cd ios && pod installRun the React Native App –
Open the terminal and jump into your project path then run the following command.
react-native run-android // for android
or
react-native run-ios // for iOS
So we completed the react-native Virtual Reality application which is “How to build virtual reality app in react native“.
You can find my post on medium as well click here please follow me on medium as well.
You can find my next post here.
If have any query/issue, please feel free to ask.
Happy Coding Guys.

Hi, I am a professional Ionic and React Native Pixel Perfect App Designer and Developer, with expertise in Client Communication, Bug Fixing, Third Party Lib, Version Control Tools, Requirement Understanding, and managing teams, I have 6+ years of experience in the same domain as well as in Codeigniter, JS, IoT, and more than 10 other languages. For the last 6+ years, not a single day went without design/development.
Please follow me on Medium: https://nehadwivedi1004.medium.com/