
Uploading document using file chooser:
Here we learn “How to upload document using file chooser in ionic3 and ionic4“, in which we upload doc, and showing multiple doc using base64 and file chooser.
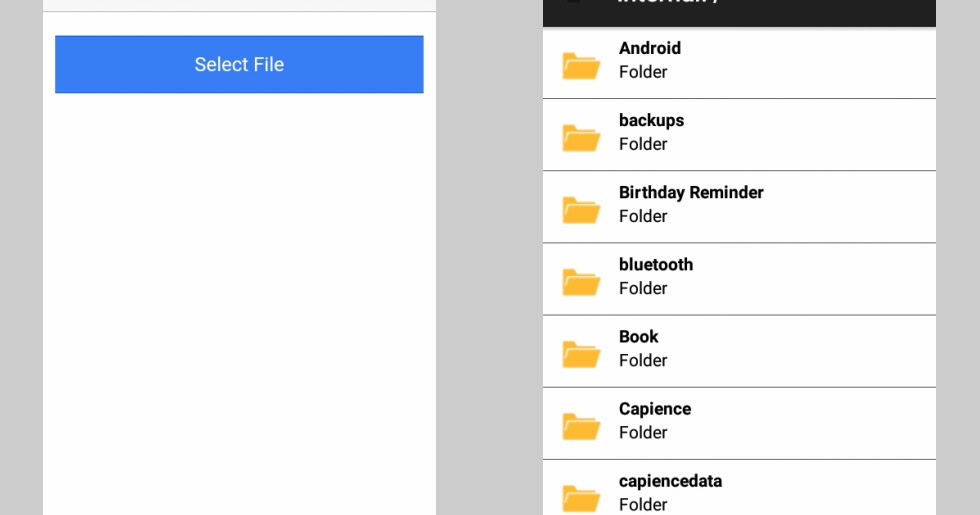
Output Example –
Follow these steps for uploading document using file chooser.
Step1:
install the file chooser plugin, Opens the file picker on Android for the user to select a file, returns a file URI.
ionic cordova plugin add cordova-plugin-filechooser
npm install --save @ionic-native/file-chooser
ionic cordova plugin add com-badrit-base64
npm install --save @ionic-native/base64
Step 2:
Import the plugin in app.module.ts file and add into provider:
import { FileChooser } from '@ionic-native/file-chooser';
import {Base64} from "@ionic-native/base64";

   providers: [
    File,
    FileTransfer,
    {provide: ErrorHandler, useClass: IonicErrorHandler},
    Camera,
    Base64,
    FileChooser,
   ]
Step 3:
Design the html part of file
<ion-header>
    <ion-navbar color="primary">
        <ion-title>Update Document</ion-title>
    </ion-navbar>
</ion-header>

<ion-content padding>
    <ion-card class="all_card_style">
        <ion-row *ngFor="let docs of documents,let i = index">
            <ion-col col-10>
                {{docs.document_title}}
            </ion-col>
            <ion-col col-2>
                <img src="assets/imgs/trash.png"
                (click)="deleteDoc(docs.id)" style="width: 50%"/>
            </ion-col>
            <hr class="hr_line">
        </ion-row>
    </ion-card>
    <ion-row>
        <ion-col col-7>
            <ion-item class="input_box_class" class="item_file"
                *ngFor="let docs of UriData">
                {{docs.name}}
            </ion-item>
        </ion-col>
        <ion-col col-5 class="col_upload">
            <button  class="blue_btn" ion-button color="secondary"
            (click)="selectDocument()">Doc erhalten</button>
        </ion-col>
    </ion-row>
    <div align="center">
        <div *ngIf=" UriData.length > 0">
            <button ion-button (click)="uploadDoc()">Upload
            Document</button>
        </div>
    </div>
</ion-content>
Step 4:
Now write the logic for uploading document, open .ts file
import { FileChooser } from '@ionic-native/file-chooser';
import {Base64} from "@ionic-native/base64";

constructor(private fileChooser: FileChooser,public base64: Base64){}

    selectDocument() {
       this.fileChooser.open().then((imageData) => {
            console.log('imagedata',imageData)
             <span style="color: #3366ff;"> //
             this.signupSlider.autoHeight = true;</span>
            this.UriData.push({name:
            imageData.substr(imageData.lastIndexOf('/') + 1)});
            console.log("Data Uri =>", this.UriData);
            this.base64.encodeFile(imageData).then((base64File:string)
            => {
          this.imageURI.push(base64File.substr(base64File.indexOf(',')
          + 1));
         }, (err) => {
             console.log(err);
         });
        }, (err) => {
            console.log(err);
            alert(err);
        });
    }

    uploadDoc() {
        var data = {
            access_token: this.access_token,
            documents: this.imageURI
        }
        this.api_data.updateDocs(data).then(
            data => {
                this.fetchdata = data;
                let toast = this.toastCtrl.create({
                    message:  this.fetchdata.message,
                    duration: 3000,
                    position: 'top'
                });
                toast.present();
                this.navCtrl.setRoot(PageName);
            }, (err) => {
                console.log(err);
            });
    }
Important Note –
- If you using the File plugin then it requires the absolute path of the file to read but the File Chooser plugin returns a URI.
- Very often we just need the “read” access to the file system of our user and allow them to upload their files (such as images).
So we completed the tutorial which is “How to upload document using file chooser in ionic3 and ionic4“.
You can find my post on medium as well click here please follow me on medium as well.
You can find my next post here.
If have any query/issue, please feel free to ask.
Happy Coding Guys.

Hi, I am a professional Ionic and React Native Pixel Perfect App Designer and Developer, with expertise in Client Communication, Bug Fixing, Third Party Lib, Version Control Tools, Requirement Understanding, and managing teams, I have 6+ years of experience in the same domain as well as in Codeigniter, JS, IoT, and more than 10 other languages. For the last 6+ years, not a single day went without design/development.
Please follow me on Medium: https://nehadwivedi1004.medium.com/
Good post. I will be going through a few of these issues as well..
Informative article, totally what I was looking for.
Because the admin of this website is working, no doubt very quickly it will be
well-known, due to its feature contents.
What’s Taking place i am new to this, I stumbled upon this I’ve discovered
It positively helpful and it has aided me out loads.
I hope to give a contribution & assist other users like its helped me.
Great job.
Excellent article. Keep writing such kind of info on your page.
Im really impressed by your blog.
Hello there, You have done an excellent job. I’ll certainly digg
it and in my view recommend to my friends. I’m confident they will
be benefited from this web site.
When someone writes an piece of writing he/she keeps the idea of a userr in his/her brain that how a user can understand it.
So that’s whyy this article iis perfect. Thanks!
I know this web page presents quality based articles and additional stuff,
is there any other website which offers these kinds of information in quality?
Pretty! This has been an extremely wonderful article.
Many thanks for supplying this info.
You’ve made some really good points there. I looked on the internet for additional information about the issue and found most individuals will go along with your
What’s up everyone, it’s my firest pay a visit
at this web page, and post is genuinely fruitful in favor of me,
keep up posting tgese content.