

Setup the android studio with firebase in react-native:
Here we are going to discuss “Setup the android studio with firebase in react-native” which is a next lesson of firebase integration, as well as you find the first lesson here-https://www.itechinsiders.com/2019/09/how-to-send-firebase-notification-in-react-native/ which is a first part of firebase setup.
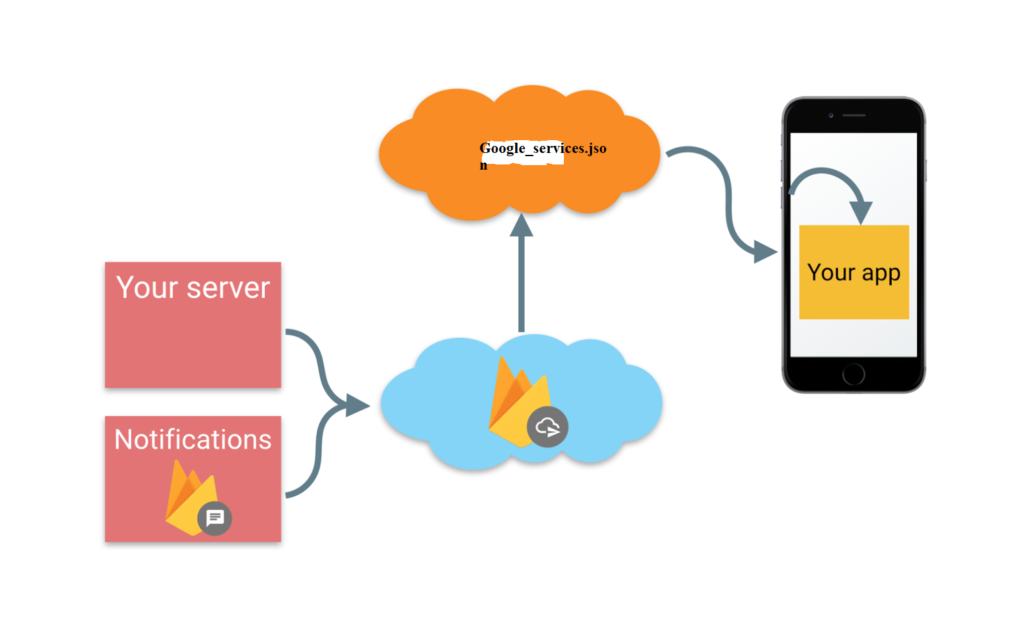
Firebase flow –
Step 1:
Now we start with plugin setup and there is a npm plugin which handles firebase, so first we need to install this plugin.
 npm install --save react-native-firebase
  or you can
 yarn add react-native-firebase
Step 2:
We need to link react-native-firebase to our project first. please run the following command in the root directory
react-native link react-native-firebaseChecking the Android Studio Configuration after firebase linking
Here we are going to check the dependency of app, so let’s start
Please check these lines in your build.gradle, if not added then add it
dependencies {
 implementation project(':react-native-firebase')
 implementation "com.google.android.gms:play-services-base:16.1.0"
 implementation 'com.google.firebase:firebase-core:16.0.9'
 implementation "com.google.firebase:firebase-messaging:18.0.0" <--
 this line is important for using cloud messaging notification, so
 it's important to add
 implementation 'me.leolin:ShortcutBadger:1.1.21@aar' // <-- Add this
 line if you wish to use the badge on Android}
}
And please check this line at the bottom of this file(last line of the file)
apply plugin: 'com.google.gms.google-services'- Got to your project level build.gradle file (path of this file is: android –> build.gradle )
And the file is look like this, check each line very carefully
buildscript {
ext {
  buildToolsVersion = "28.0.3"
  minSdkVersion = 16
  compileSdkVersion = 28
  targetSdkVersion = 28
  supportLibVersion = "28.0.0"
  googlePlayServicesVersion = "16.0.0" // Make Sure This line is added
  over here only

repositories {
 google()
 jcenter()
 mavenCentral()
}

dependencies {
 // classpath 'com.android.tools.build:gradle:3.4.0'
  classpath 'com.android.tools.build:gradle:3.4.1'
  classpath 'com.google.gms:google-services:4.2.0' // Make Sure This
  line is added over here only
}
}
}

allprojects {
 repositories {
  mavenLocal()
  google()
  jcenter()
}
}

maven {
// All of React Native (JS, Obj-C sources, Android binaries) is installed from npm
url "$rootDir/../node_modules/react-native/android"  // Make Sure This block is added over here only
}
}
Note: make sure google() is always above the jcenter()
- Now you need to make some changes in your android/app/src/main/AndroidManifest.xml file
<uses-permission android:name="android.permission.INTERNET" />
<uses-permission  android:name="android.permission.RECEIVE_BOOT_COMPLETED" />
<uses-permission android:name="android.permission.VIBRATE" />

 <!-- start of firebase messaging services -->

<service android:name="io.invertase.firebase.messaging.RNFirebaseMessagingService">
<intent-filter>
<action android:name="com.google.firebase.MESSAGING_EVENT" />
</intent-filter></service>
<service android:name="io.invertase.firebase.messaging.RNFirebaseInstanceIdService">
<intent-filter>
<action android:name="com.google.firebase.INSTANCE_ID_EVENT"/>
</intent-filter></service>

<!-- end of firebase messaging services -->
- As well as add the RNFirebaseMessagingPackage to your android/app/src/main/java/com/[app name]/MainApplication.java
 // for firebase dependencies
import io.invertase.firebase.RNFirebasePackage;
import io.invertase.firebase.messaging.RNFirebaseMessagingPackage; // <-- Add this line
import io.invertase.firebase.notifications.RNFirebaseNotificationsPackage; // <-- Add this line
//package override definition
@Override
protected List<ReactPackage> getPackages() {
return Arrays.<ReactPackage>asList(
new MainReactPackage(),
new RNFirebasePackage(),
new RNFirebaseMessagingPackage(), // <-- Add this line
new RNFirebaseNotificationsPackage(), // <-- Add this line
)}
You can find my post on medium click here, please follow me on medium as well.
Android setup is completed now.
you can find the 3 part of this tutorial, here – NEXT , please click on next to find the next part of this tutorial.
If have any query/issue, please feel free to ask.
Happy Coding Guys.

Hi, I am a professional Ionic and React Native Pixel Perfect App Designer and Developer, with expertise in Client Communication, Bug Fixing, Third Party Lib, Version Control Tools, Requirement Understanding, and managing teams, I have 6+ years of experience in the same domain as well as in Codeigniter, JS, IoT, and more than 10 other languages. For the last 6+ years, not a single day went without design/development.
Please follow me on Medium: https://nehadwivedi1004.medium.com/
