

Introduction –
This post is a second part of integrating stripe payment gateway with react native, here i am going to in detail about “Create a React Native app for Stripe integration“.
if you didn’t create the stripe developer account then please follow this blog first.
click here.
Output –

What we do –
Here we are going to create a react native app where we get the token then we use to send that token to our backend for doing successfully payment, so let’s start.
Step 1- Creating a react native app
Create a basic react-native app using below command
react-native init stripePaymentStep 2- Going to within project folder
cd stripePaymentStep 3- Run the project
for running project android or iOS you need to run these commands.
react-native run-android
      or
react-native run-ios
Step 4- Installing the third party dependency
here we are going to install the npm tipsi-stripe for doing transction on app side
npm install --save tipsi-stripeafter installing the dependency successfully now you need to clone the git repo of this plugin, so we don’t need to create the UI, you can copy and paste these files where you want to use.
Step 5- Cloning the git repo of tipsi-stripe
for more detail please follow the – https://github.com/tipsi/tipsi-stripe
git clone https://github.com/tipsi/tipsi-stripe.gitStep 6 – Copying the tipsi-stripe folder to our app
After successfully clone the git repo, you see the folder structure like
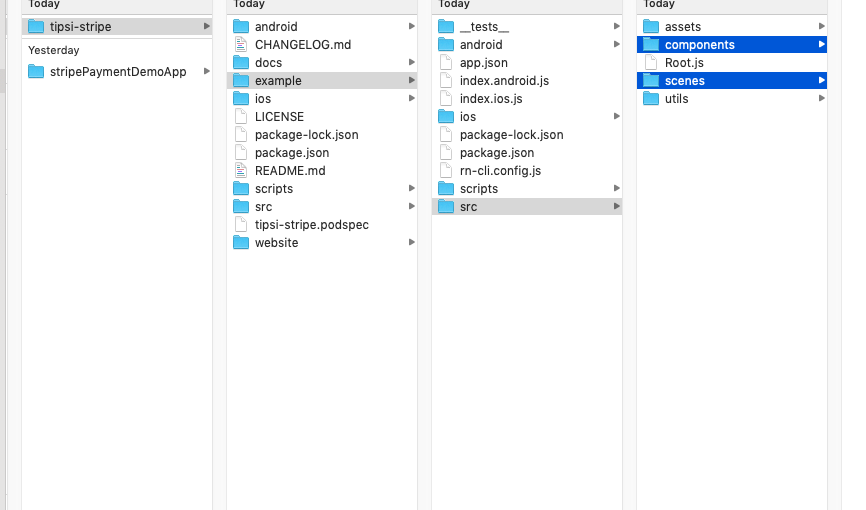
Note – here you need to go to the below path and copy the both files components and screens and paste it into your react native project.
tipsi-stripe=>example=>src=>components and screens
Step 7 – Now check you react native project structure
open you react native project which is look like
here you see your component and screens folder.
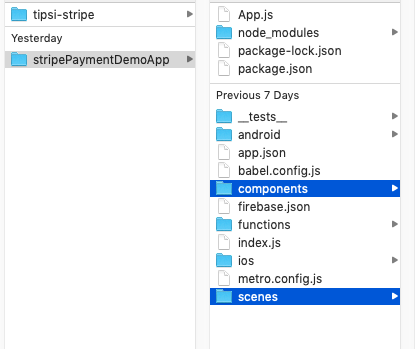
Step 8 – Modify App.js
Now we are going to modify our app.js file, we need to copy the CardFormScreen file from the scenes folder and paste it into your app.js file.
import React, {PureComponent} from 'react';
import {StyleSheet, View, Text} from 'react-native';
import Button from './components/Button';
import stripe from 'tipsi-stripe';

export default class CardFormScreen extends PureComponent {
  static title = 'Card Form';
  state = {
    loading: false,
    token: null,
  };

  handleCardPayPress = async () => {
    try {
      this.setState({loading: true, token: null});
      const token = await stripe.paymentRequestWithCardForm({
        // Only iOS support this options
        smsAutofillDisabled: true,
        requiredBillingAddressFields: 'full',
        prefilledInformation: {
          billingAddress: {
            name: ' App',
            line1: 'Canary Place',
            line2: '3',
            city: 'Macon',
            state: 'Georgia',
            country: 'US',
            postalCode: '31217',
            email: 'app@mailnator.com',
          },
        },
      });
     this.setState({loading: false, token});
    } catch (error) {
      this.setState({loading: false});
    }
  };

 render() {
   const {loading, token} = this.state;
    return (
      <View style={styles.container}>
        <Text style={styles.header}>Card Form Example</Text>
        <Text style={styles.instruction}>
          Click button to show Card Form dialog.
        </Text>
        <Button
          text="Enter you card and pay"
          loading={loading}
          onPress={this.handleCardPayPress}
        />

        <View style={styles.token}>
          {token && (
            <View>
              <Text style={styles.instruction}>Token: {token.tokenId}
               </Text>
              <Button
                text="Make Payment"
                loading={loading}
                onPress={this.makePayment}></Button>
            </View>
          )}
        </View>
      </View>
    );
  }
}

const styles = StyleSheet.create({
  container: {
    flex: 1,
    justifyContent: 'center',
    alignItems: 'center',
  },
  header: {
    fontSize: 20,
    textAlign: 'center',
    margin: 10,
  },
  instruction: {
    textAlign: 'center',
    color: '#333333',
    marginBottom: 5,
  },
  token: {
    height: 20,
  },
});
Step 9 – Need to set the publishableKey
Now we need to set the publishableKey which we get from the stripe developer account, go to your developer account and copy that key.
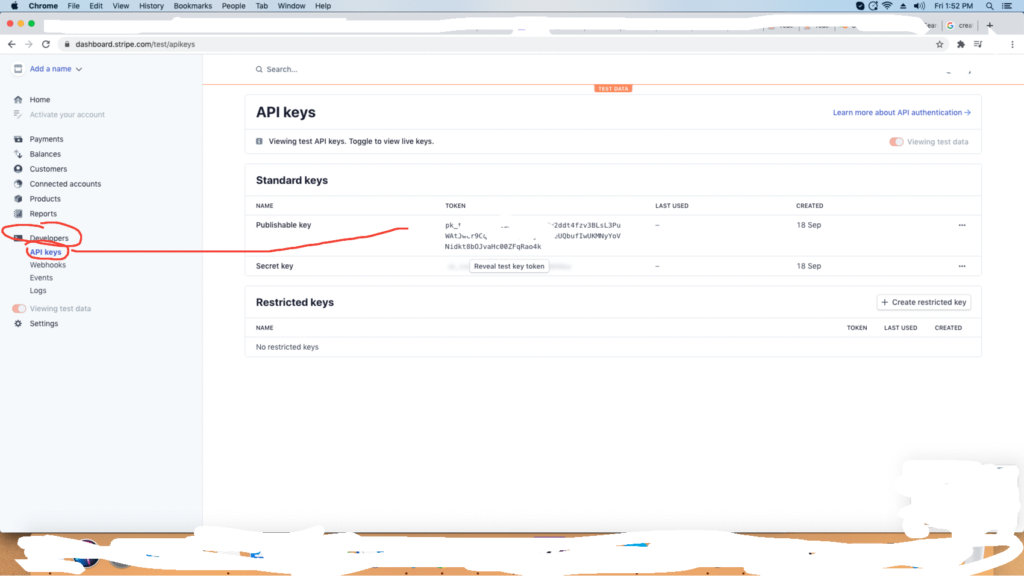
after getting this key successfully, you need to paste it in your app.js file
stripe.setOptions({
  publishableKey:  pk_test_51HSepBAAcuGAEoJYv---------r9Cq0DWkkX5Qoavjnmn2eUQbufIwUKMNyYoVNidkt8bOJvaHc00ZFqRao4k',
})
Step 10 – Complete App.js file code is look like
import React, {PureComponent} from 'react';
import {StyleSheet, View, Text} from 'react-native';

import Button from './components/Button';
import stripe from 'tipsi-stripe';

stripe.setOptions({
  publishableKey:
 pk_test_51HSepBAAcuGAEoJYv2ddt4fzv3BLsL3PuWAtJwCr9Cq0DWkkX5Qoavjnmn2eUQbufIwUKMNyYoVNidkt8bOJvaHc00ZFqRao4k',
});

export default class CardFormScreen extends PureComponent {
  static title = 'Card Form';
  state = {
    loading: false,
    token: null,
  };

  handleCardPayPress = async () => {
    try {
      this.setState({loading: true, token: null});
      const token = await stripe.paymentRequestWithCardForm({
        // Only iOS support this options
        smsAutofillDisabled: true,
        requiredBillingAddressFields: 'full',
        prefilledInformation: {
          billingAddress: {
            name: ' App',
            line1: 'Canary Place',
            line2: '3',
            city: 'Macon',
            state: 'Georgia',
            country: 'US',
            postalCode: '31217',
            email: 'app@mailnator.com',
          },
        },
      });

      this.setState({loading: false, token});
    } catch (error) {
      this.setState({loading: false});
    }
  };

  render() {
    const {loading, token} = this.state;

    return (
      <View style={styles.container}>
        <Text style={styles.header}>Card Form Example</Text>
        <Text style={styles.instruction}>
          Click button to show Card Form dialog.
        </Text>
        <Button
          text="Enter you card and pay"
          loading={loading}
          onPress={this.handleCardPayPress}
        />

        <View style={styles.token}>
          {token && (
            <View>
              <Text style={styles.instruction}>Token: {token.tokenId}
              </Text>
              <Button
                text="Make Payment"
                loading={loading}
                onPress={this.makePayment}></Button>
            </View>
          )}
        </View>
      </View>
    );
  }
}

const styles = StyleSheet.create({
  container: {
    flex: 1,
    justifyContent: 'center',
    alignItems: 'center',
  },
  header: {
    fontSize: 20,
    textAlign: 'center',
    margin: 10,
  },
  instruction: {
    textAlign: 'center',
    color: '#333333',
    marginBottom: 5,
  },
  token: {
    height: 20,
  },
});
So getting stripe token is completed here, if you done all steps correctly then you able to find the token which is like

So we completed the step 2 and step 2which is “Create a React Native app for Stripe integration” part of “How to integrate stripe payment gateway in react native“.
You can find my post on medium as well click here please follow me on medium as well.
You can find next step of this post here.
If have any query/issue, please feel free to ask.
Happy Coding Guys.

Hi, I am a professional Ionic and React Native Pixel Perfect App Designer and Developer, with expertise in Client Communication, Bug Fixing, Third Party Lib, Version Control Tools, Requirement Understanding, and managing teams, I have 6+ years of experience in the same domain as well as in Codeigniter, JS, IoT, and more than 10 other languages. For the last 6+ years, not a single day went without design/development.
Please follow me on Medium: https://nehadwivedi1004.medium.com/
